
Electron is one of the most popular frameworks for building cross-platform desktop applications. It's a great way to build desktop applications that can run on Windows, Mac, and Linux with a single codebase. It might not be totally obvious, but one of Electron's major benefits is that it's built on top of Chromium, which means that you can use all of the web technologies that you're already familiar with. This includes HTML, CSS, and JavaScript. In addition, you can write native code using the bundled NodeJS runtime. Why is this so special for Ditto? Well if you run Ditto inside of a Web Browser, we immediately use the WebAssembly build of our system. However, Web Browsers don't have any ability to leverage Ditto's Peer-to-Peer connectivity like Local Area Network, Apple Wireless Direct, or Bluetooth Low Energy. Put plainly, the Web Browser version of Ditto can only talk to the Big Peer (Ditto's cloud peer).
However, when Ditto runs in Electron or NodeJS, it has access to APIs that the web browser doesn't provide: such as access to the local file system, the ability to run native code, and advanced networking capabilities such as Local Area Network, Bluetooth Low Energy, and Apple Wireless Direct Link. This means, if you build an application using Ditto and Electron, you get the best of both worlds: cutting edge web development along with the novel capabilities of Ditto's peer-to-peer technology. Deploying a Ditto+Electron application means that your users will be able to have Mac, Windows, Linux (even Raspberry Pi) apps talk to each other without the need for a server.
Usually, Electron and Ditto alone don't make for a comprehensive development experience. You'll need to add a few more tools to the mix. In this tutorial, we'll show you how to quickly get started with some of the most popular enterprise tools and frameworks such as Ditto, Electron, React, TypeScript and Vite. Your project will end up looking like this:
Quick Start
-
Ensure that you have at least Node Version 18 or higher installed. You can check your version by running
node -vin your terminal. If you need to update, you can do so by following the instructions here. -
Run
npx electron-vitein your terminal. This will create a new Electron app in the current directory. A series of prompts will appear. For the purposes of this tutorial, select:
✔ Project name: electron-react-tailwind-vite-ditto-sample
✔ Project template: React
-
Now
cd electron-react-tailwind-vite-ditto-sampleto enter the new directory. If you chose a different name for the project, replaceelectron-react-tailwind-vite-ditto-samplewith the name you chose. -
Using your favorite editor, open the directory and you should see several files and folders. You'll need to begin by installing the dependencies. So run:
npm install
- Install the Ditto SDK by running the following install scripts in your terminal.
npm install @dittolive/ditto @dittolive/react-ditto
This will install the Ditto SDK and the Ditto React SDK. Generally in this project you'll only need the Ditto React SDK, but we'll install both for the sake of completeness.
- To force
@dittolive/dittoto use the NodeJS build, add the following to yourvite.config.tsfile:
//...
- renderer
+ renderer({
+  resolve: {
+    '@dittolive/ditto': () => ({ platform: 'node' })
+  }
+}),
- Before we continue, create a new application at [https://portal.ditto.live]. For this example, you'll need to create a new application with
OnlinePlayground. You will need:
- The AppID, which you can copy from the "Big Peer Information Section"
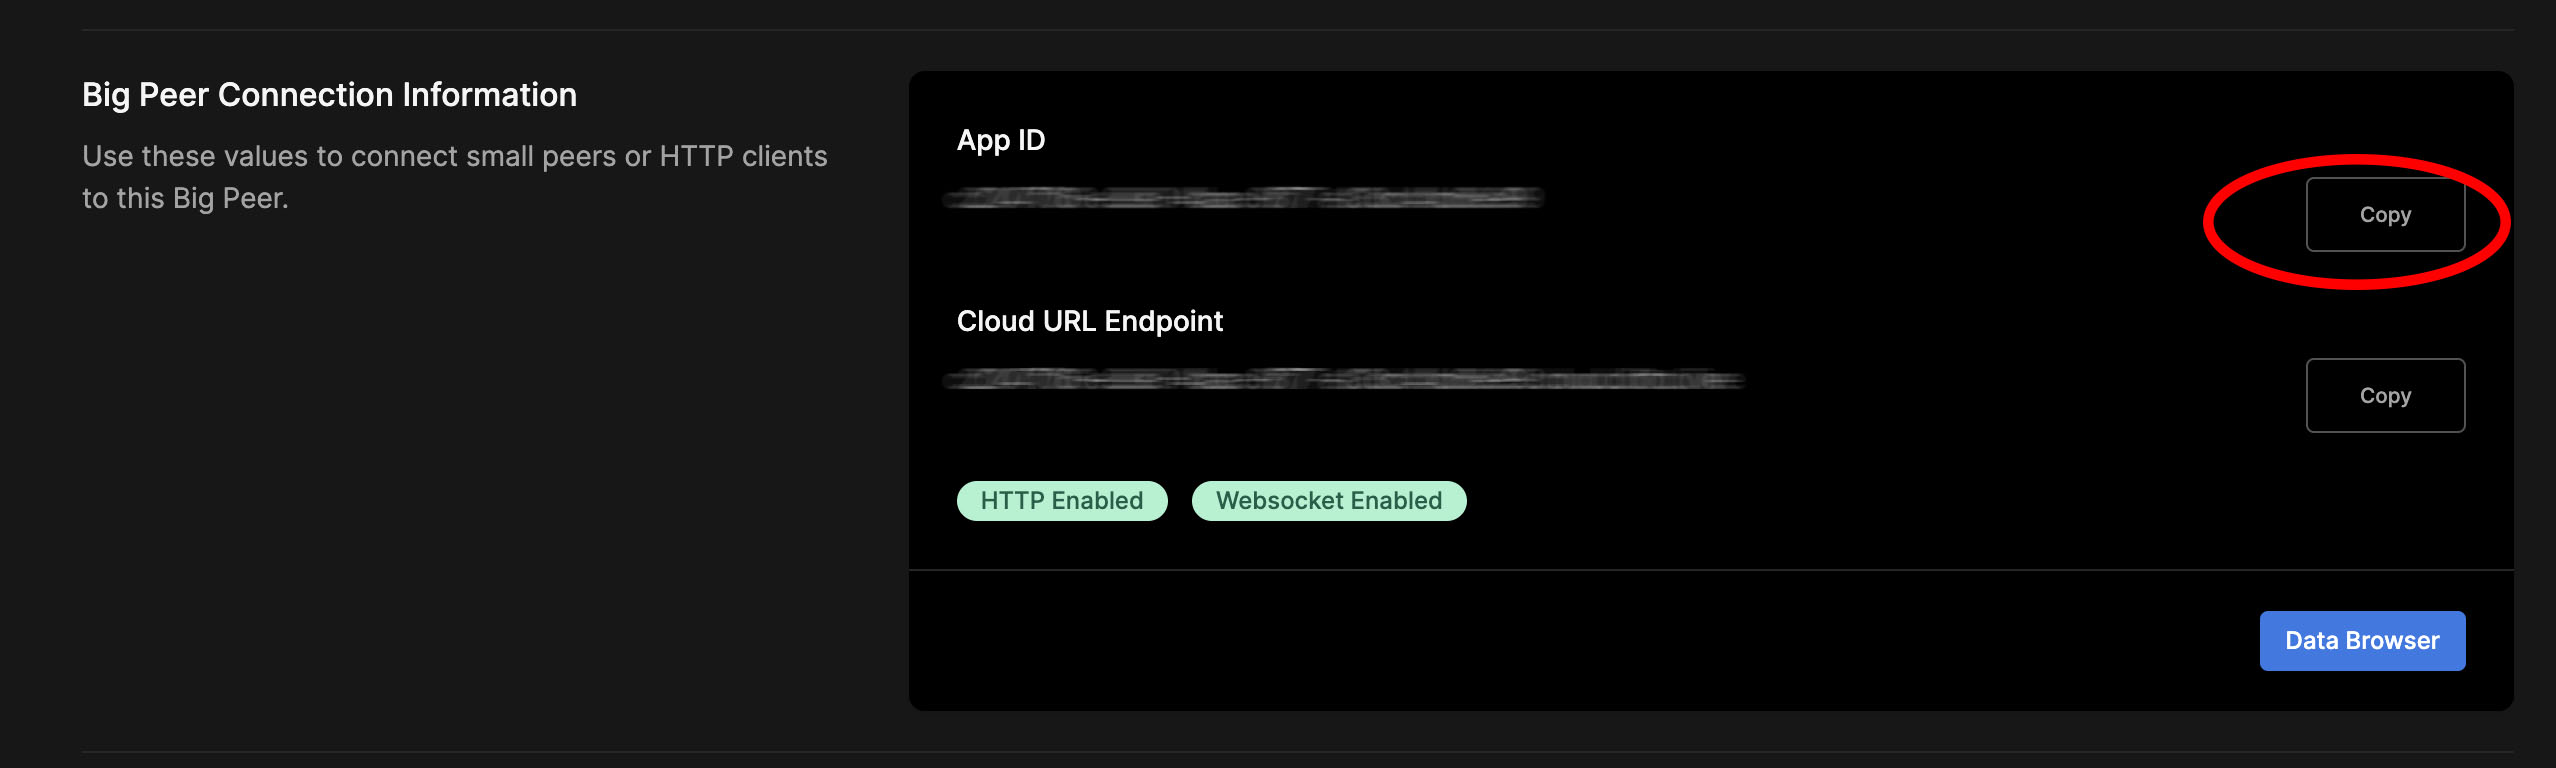
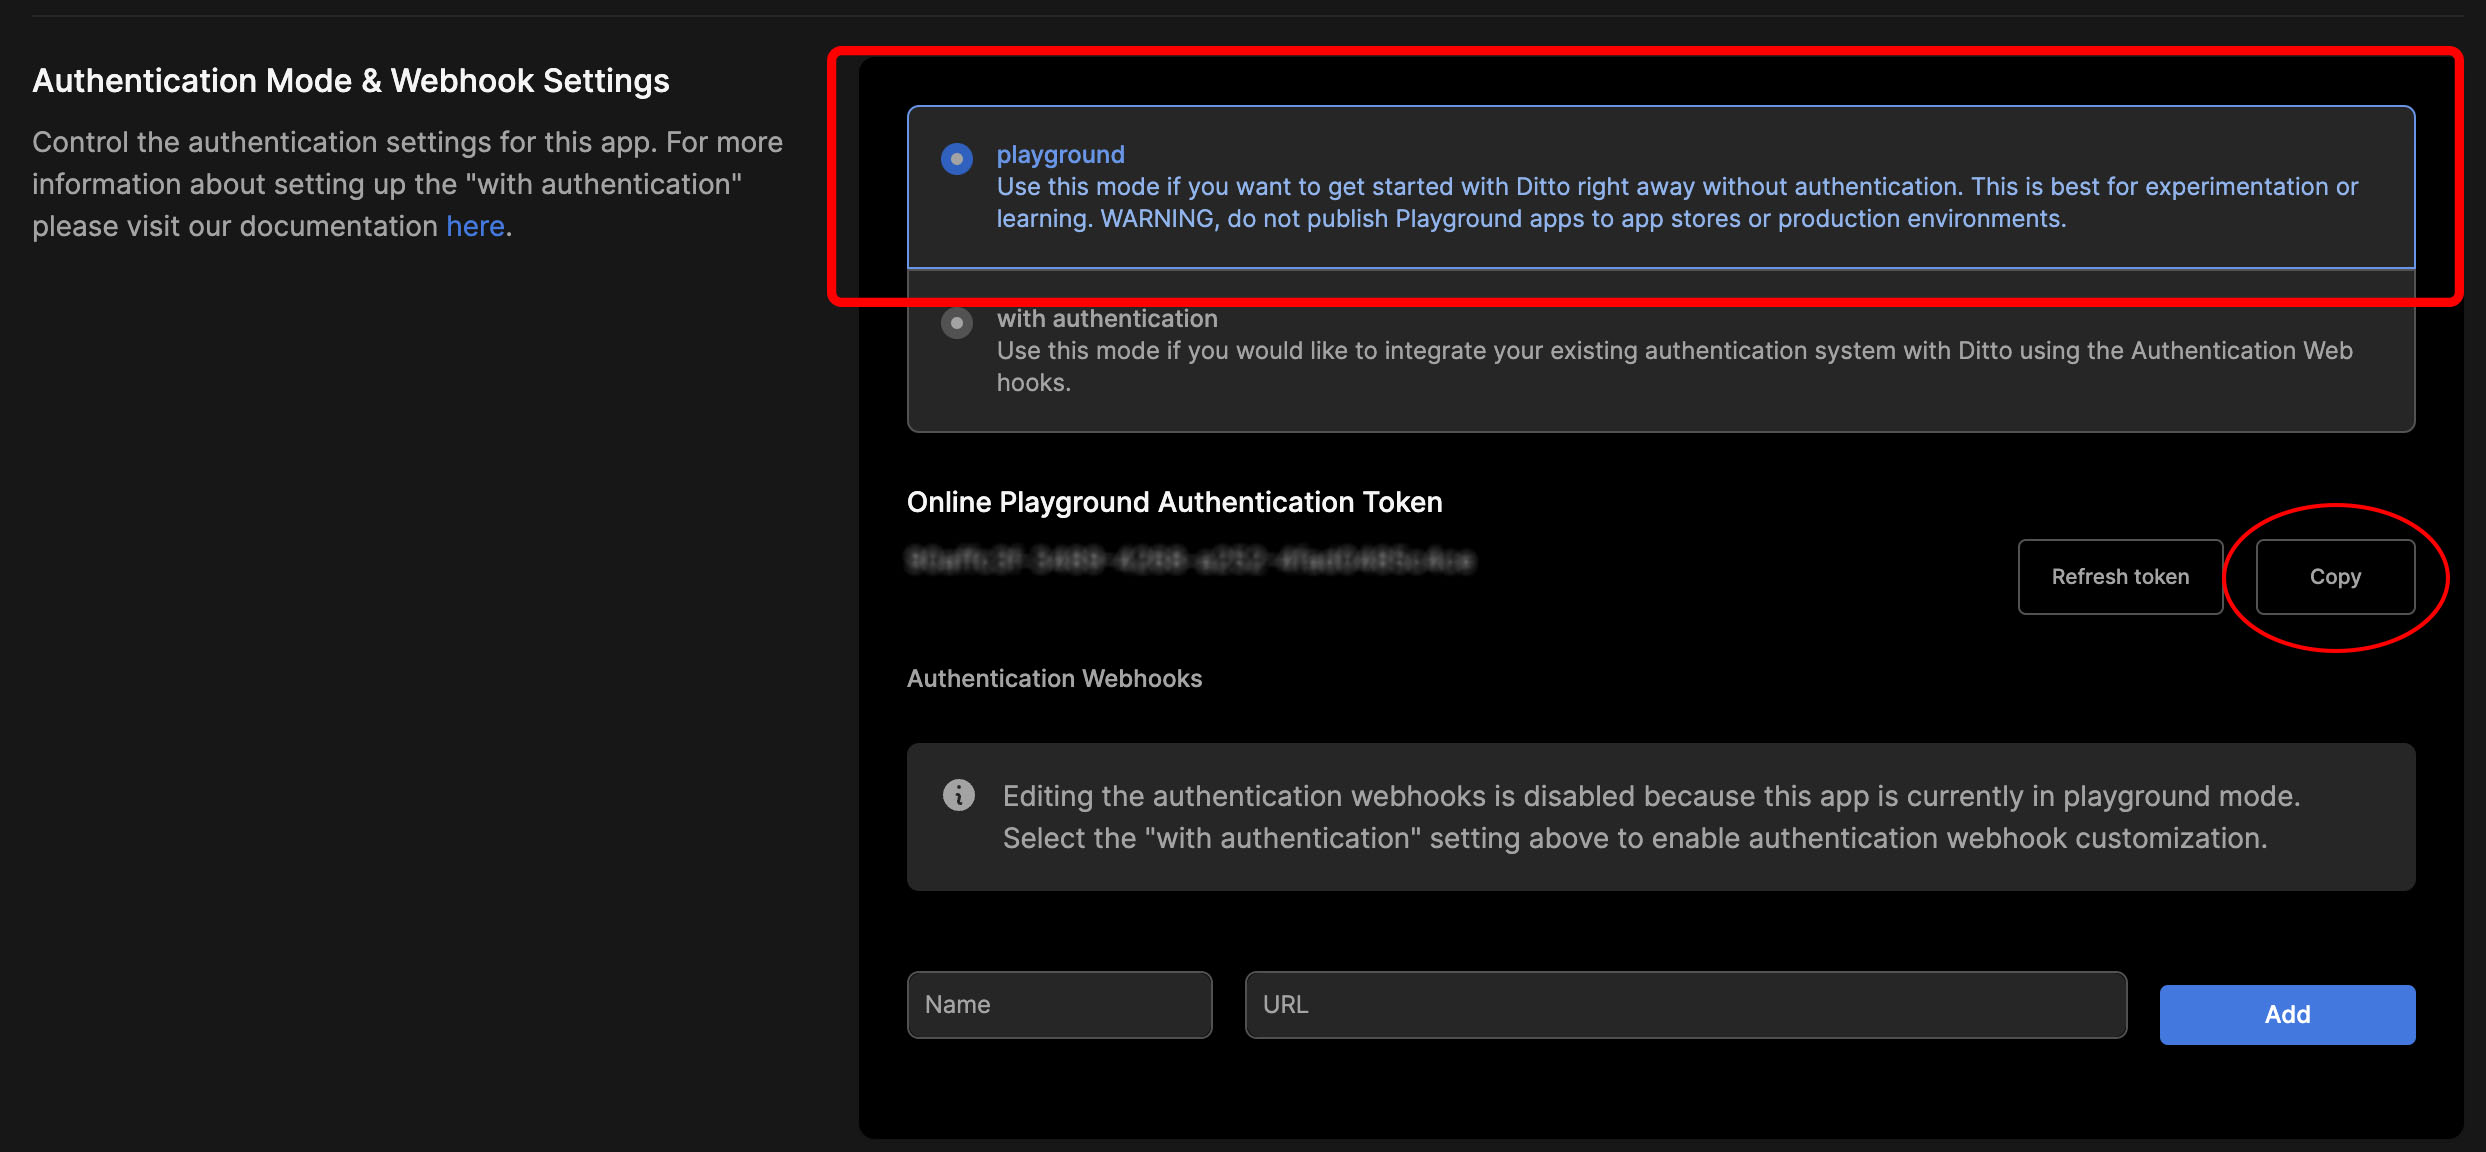
- The OnlinePlayground Token which can be found in the "Authentication Mode & Webhook Settings" section. Ensure that the "playground" option is selected, and then copy the token.
- Back in your editor, open
src/App.tsxand add the following code to the top of the file:
import { DittoProvider } from "@dittolive/react-ditto"
import { Ditto } from "@dittolive/ditto"
const createDittoInstance = () => {
const ditto = new Ditto({
type: "onlinePlayground",
token: "REPLACE_ME",
appID: "REPLACE_ME",
})
ditto.startSync()
return ditto
}
function App() {
return (
<DittoProvider setup={createDittoInstance}>
{({ loading, error }) => {
if (loading) return <span>Loading Ditto...</span>
if (error)
return (
<span>
There was an error loading Ditto. Error: {error.toString()}
</span>
)
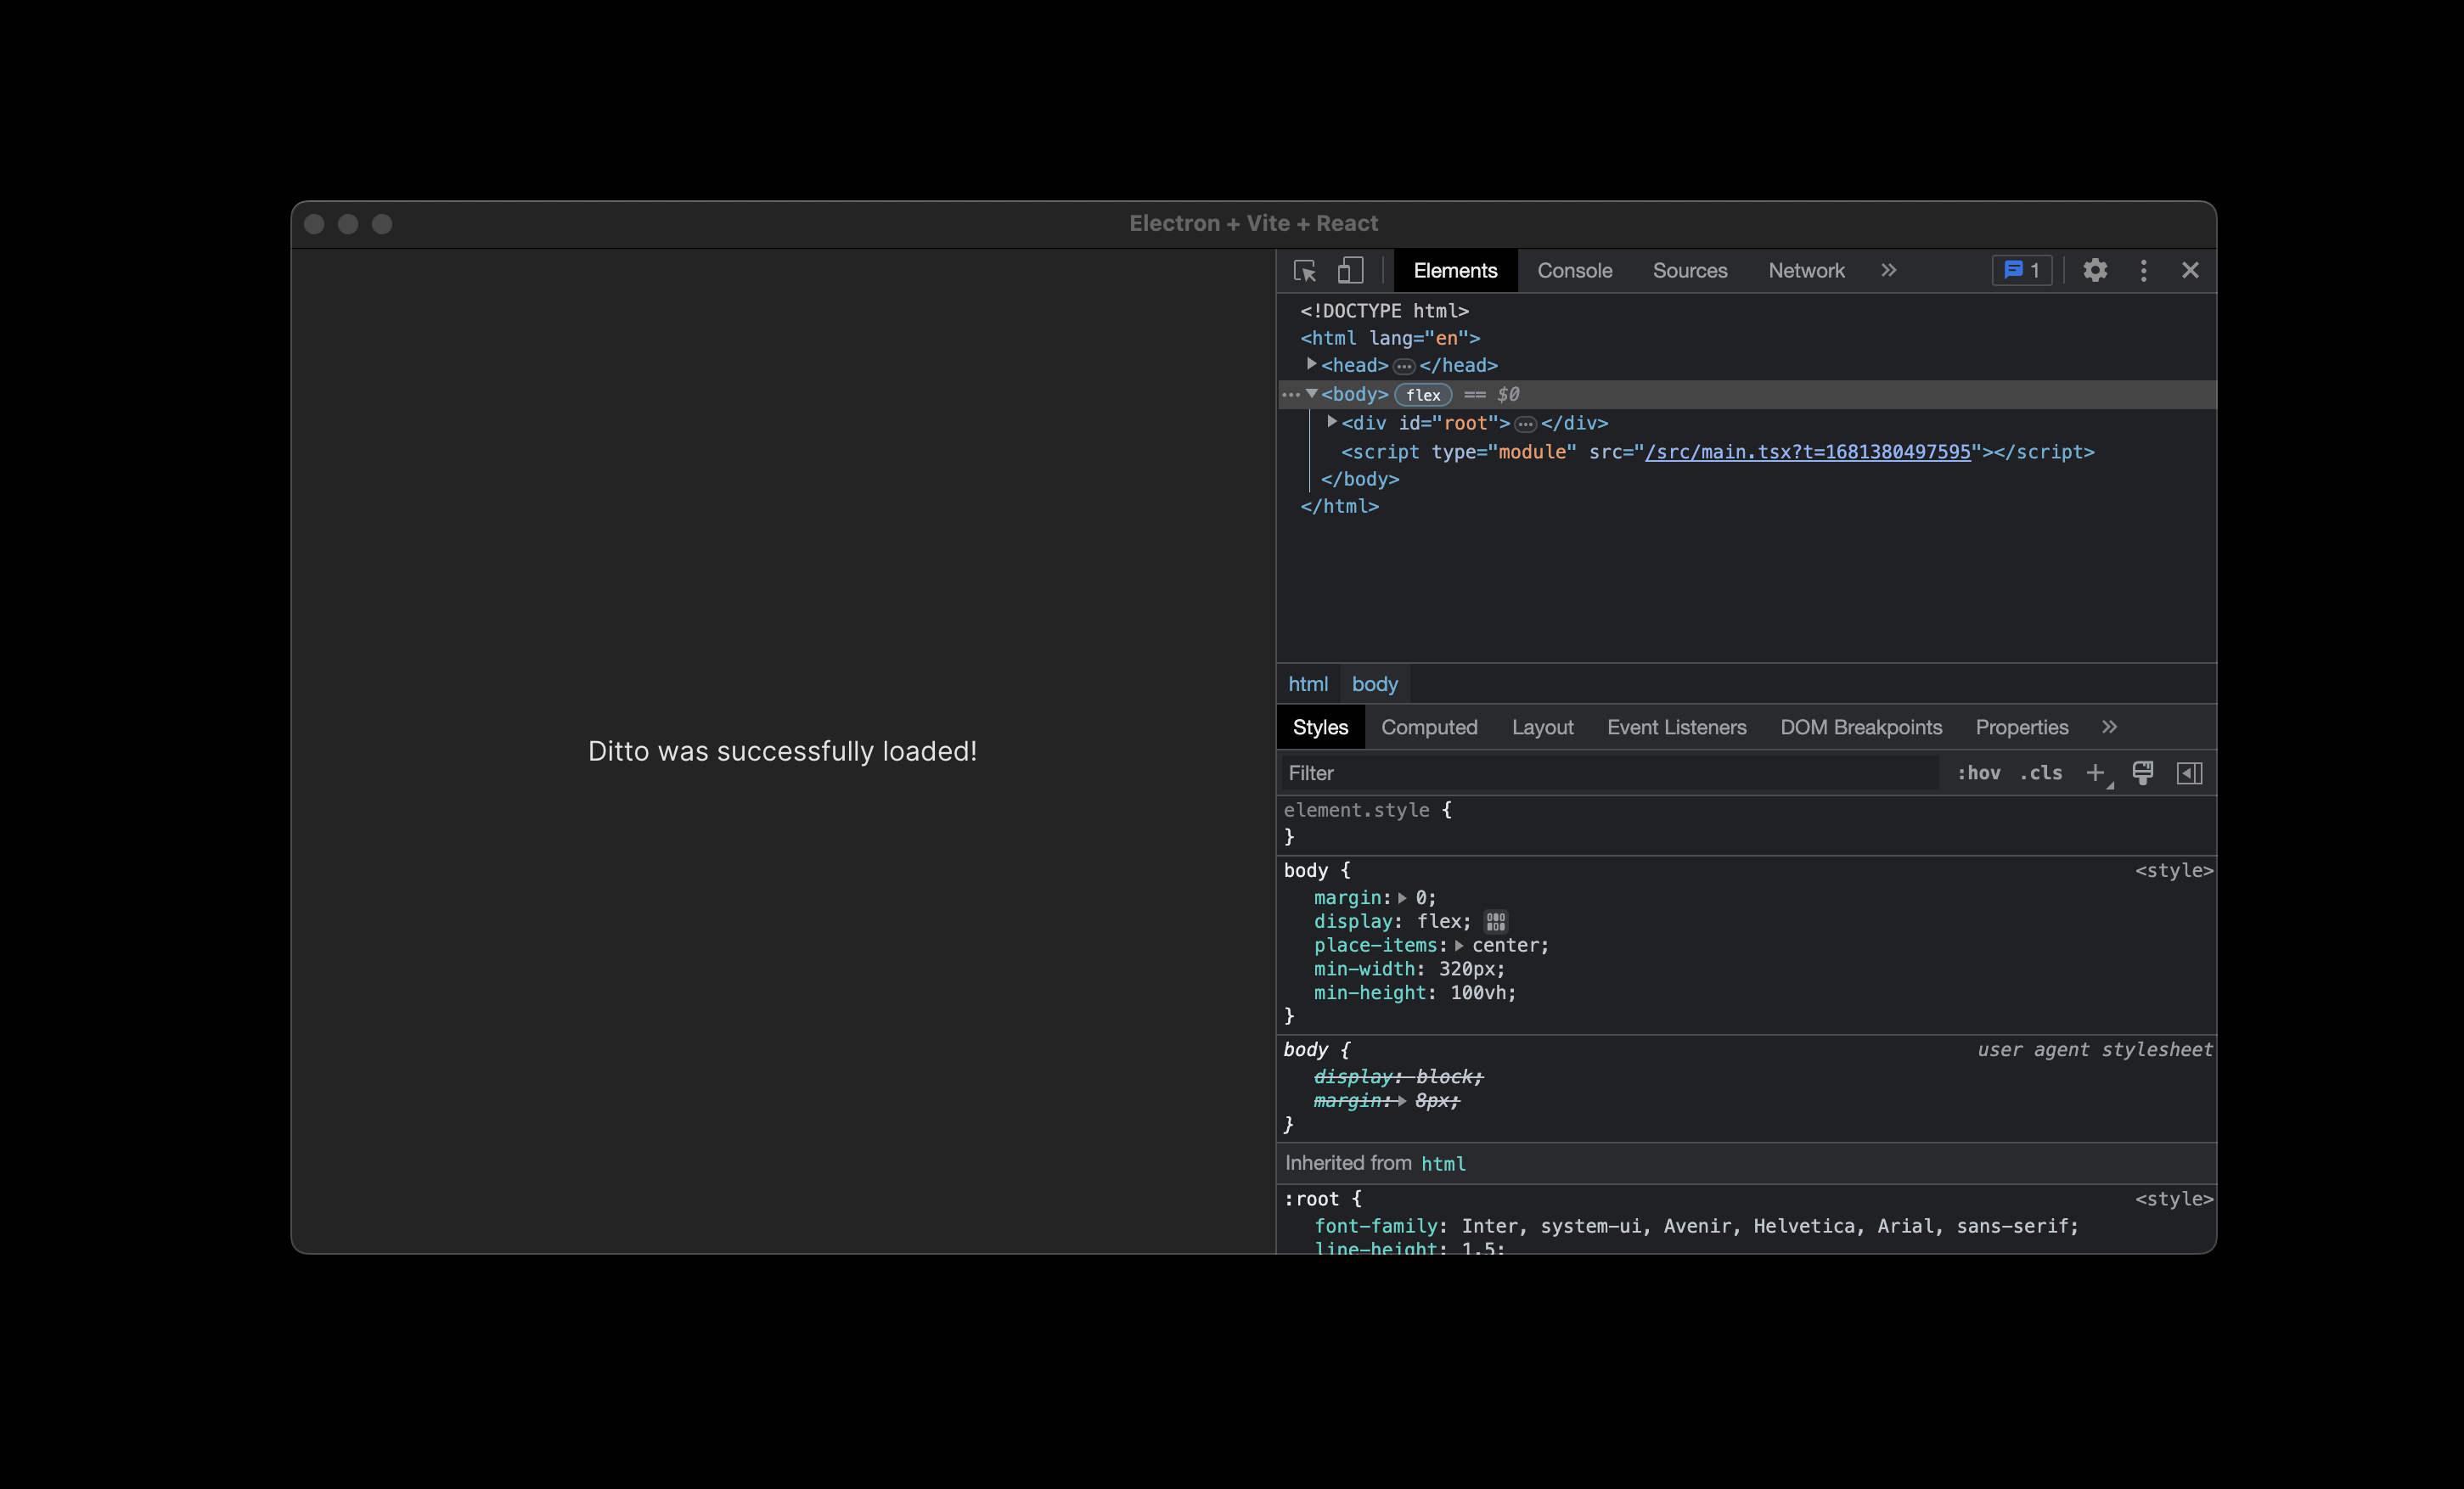
return <span>Ditto was successfully loaded!</span>
}}
</DittoProvider>
)
}
Now run:
npm run dev
If everything was successfully setup, then you should see:
At this point, you've successfully set up Ditto, TypeScript, and Electron. You can choose to stop this tutorial here and go on if you know what you're doing. However, if you'd like to stick around, I can walk you through adding Tailwind CSS so we can get started building a simple application.
Going Further
If you've decided to stay along for the ride, we're now going to add Ditto's favorite styling framework and create a simple To Do List application that uses Ditto's React SDK.
Bonus! Using Tailwind.
- At Ditto, we love using Tailwind CSS to style our applications. To introduce Tailwind in this project, follow the intructions.
npm install -D tailwindcss postcss autoprefixer
- Then create a bootstrapped tailwind.config.js file in the root of your project by running:
npx tailwindcss init -p
- Open this file and edit tailwind.config.js the following:
/** @type {import('tailwindcss').Config} */
export default {
  content: ["./index.html", "./src/**/*.{js,ts,jsx,tsx}"],
  theme: {
    extend: {},
  },
  plugins: [],
}
- Now create a file called
src/index.cssand add the following:
@tailwind base;
@tailwind components;
@tailwind utilities;
- If you want to test that Tailwind is working, open
src/App.tsxreplace the following:
return <span>Ditto was successfully loaded!</span>
With
return (
  <h1 className="text-3xl font-bold underline text-blue-500">
    Ditto was successfully loaded with tailwind!
  </h1>
)
- Now run
npm run devand you should see:

- Since we now are using tailwind, we can remove the
src/index.scssandsrc/App.scssfile.
Building the Tasks functionality
- We'll need the following dependencies to style Tailwind forms nicely. In addition we'll add an extremely popular tool to handle clasname generation. Run the following to install the dependencies:
npm install -D @tailwindcss/forms classnames
- Add the following to
tailwind.config.jsto enable the'@tailwindcss/forms'plugin:
module.exports = {
  // ...
  plugins: [require("@tailwindcss/forms")],
}
- Create a new file called
src/DataService.tsand add the code below. This is our simple service layer that will handle all of our interactions with Ditto. The primary data model is calledTaskand we'll be using thetaskscollection.
import { useMutations, usePendingCursorOperation } from "@dittolive/react-ditto"

export interface Task {
  _id: string
  body: string
  isCompleted: boolean
}

const COLLECTION_NAME = "tasks"

export function useTasks() {
  const { documents } = usePendingCursorOperation({
    collection: COLLECTION_NAME,
  })
  const { updateByID, upsert, removeByID } = useMutations({
    collection: COLLECTION_NAME,
  })

  // We map over each of the document creating a task object
  // that we can use in our UI
  const tasks = documents.map((doc) => {
    return {
      _id: doc.id.value,
      body: doc.at("body").register?.value,
      isCompleted: doc.at("isCompleted").register?.value,
    }
  })

  function toggle(_id: string) {
    updateByID({
      _id: _id,
      updateClosure(mutableDocument) {
        if (mutableDocument) {
          const currentValue: boolean =
            mutableDocument.at("isCompleted").register?.value || false
          mutableDocument.at("isCompleted").set(!currentValue)
        }
      },
    })
  }

  function updateTaskBody(_id: string, body: string) {
    updateByID({
      _id: _id,
      updateClosure(mutableDocument) {
        if (mutableDocument) {
          mutableDocument.at("body").set(body)
        }
      },
    })
  }

  function createTask(body: string) {
    upsert({
      value: {
        body,
        isCompleted: false,
      },
    })
  }

  function removeTask(_id: string) {
    removeByID({
      _id: _id,
    })
  }

  return {
    tasks,
    toggle,
    createTask,
    removeTask,
    updateTaskBody,
  }
}
- Create a new file called
src/NewTaskForm.tsxand add the following code. This component is responsible for creating a new task.
import React, { useState } from "react"
import { useTasks } from "./DataService"

export function NewTaskForm() {
  const [newTaskText, setNewTaskText] = useState<string>("")
  const { createTask } = useTasks()

  return (
    <div className="mt-2 flex rounded-md shadow-sm">
      <div className="relative flex flex-grow items-stretch focus-within:z-10">
        <input
          type="text"
          name="newTaskText"
          id="newTaskText"
          value={newTaskText}
          onChange={(e) => {
            setNewTaskText(e.target.value)
          }}
          className="block w-full rounded-none rounded-l-md border-0 py-1.5 text-gray-900 ring-1 ring-inset ring-gray-300 placeholder:text-gray-400 focus:ring-2 focus:ring-inset focus:ring-indigo-600 sm:text-sm sm:leading-6"
          placeholder="New task"
        />
      </div>
      <button
        type="button"
        onClick={() => {
          createTask(newTaskText)
          setNewTaskText("")
        }}
        className="relative -ml-px inline-flex items-center gap-x-1.5 rounded-r-md px-3 py-2 text-sm font-semibold text-gray-900 ring-1 ring-inset ring-gray-300 hover:bg-gray-50"
      >
        Create
      </button>
    </div>
  )
}
- Create a new file called
src/TaskListItem.tsxand add the following code. This component is responsible for rendering a single task, and handling the logic for updating, removing, and toggling a task.
import { useEffect, useState } from "react"
import classNames from "classnames"
import { Task } from "./DataService"

interface Props {
  task: Task
  onRemovePressed: (_id: string) => void
  onTogglePressed: (_id: string) => void
  onUpdatePressed: (_id: string, body: string) => void
}

export function TaskListItem({
  task,
  onRemovePressed,
  onTogglePressed,
  onUpdatePressed,
}: Props) {
  const [taskText, setTaskText] = useState<string>("")

  useEffect(() => {
    setTaskText(task.body)
  }, [task.body])

  return (
    <div className="mt-2 flex rounded-md shadow-sm">
      <div className="relative flex flex-grow items-stretch focus-within:z-10">
        <input
          type="text"
          value={taskText}
          onChange={(e) => {
            setTaskText(e.target.value)
          }}
          onKeyDown={(e) => {
            if (e.code === "Enter") {
              onUpdatePressed(task._id, taskText)
              e.preventDefault()
            }
          }}
          className={classNames(
            "block w-full rounded-none rounded-l-md border-0 py-1.5 text-gray-900 ring-1 ring-inset ring-gray-300 placeholder:text-gray-400 focus:ring-2 focus:ring-inset focus:ring-indigo-600 sm:text-sm sm:leading-6",
            {
              "line-through": task.isCompleted,
            }
          )}
          placeholder="New task"
        />
      </div>
      <button
        type="button"
        onClick={() => {
          onTogglePressed(task._id)
        }}
        className="relative -ml-px inline-flex items-center gap-x-1.5 px-3 py-2 text-sm font-semibold text-gray-900 ring-1 ring-inset ring-gray-300 hover:bg-gray-50"
      >
        {task.isCompleted ? "Mark Incomplete" : "Mark Complete"}
      </button>
      <button
        type="button"
        onClick={() => {
          onRemovePressed(task._id)
        }}
        className="relative -ml-px inline-flex items-center gap-x-1.5 rounded-r-md px-3 py-2 text-sm font-semibold text-red-900 ring-1 ring-inset ring-red-300 hover:bg-red-50"
      >
        Remove
      </button>
    </div>
  )
}
- Create a new file called
src/TasksPage.tsxand add the following code. This component is responsible for rendering the list of tasks as wells bootstrapping the form.
import { useTasks } from "./DataService"
import { TaskListItem } from "./TaskListItem"
import { NewTaskForm } from "./NewTaskForm"

export function TasksPage() {
  const { removeTask, toggle, tasks, updateTaskBody } = useTasks()

  return (
    <div className="mt-4 mx-4 max-w-lg">
      <h1 className="text-3xl font-bold">Ditto Tasks</h1>
      <NewTaskForm />
      <hr className="my-5" />
      {tasks.map((task) => (
        <TaskListItem
          key={task._id}
          task={task}
          onRemovePressed={removeTask}
          onTogglePressed={toggle}
          onUpdatePressed={updateTaskBody}
        />
      ))}
    </div>
  )
}
- Now edit
src/App.tsxto rendersrc/TasksPage.tsxinstead of the default text:
import { Ditto } from "@dittolive/ditto"
import { DittoProvider } from "@dittolive/react-ditto"
import { TasksPage } from "./TasksPage"

console.log(
  "[App.tsx]",
  `Hello world from Electron ${process.versions.electron}!`
)

const createDittoInstance = () => {
  const ditto = new Ditto({
    type: "onlinePlayground",
    token: "REPLACE_ME",
    appID: "REPLACE_ME",
  })
  ditto.startSync()
  return ditto
}

function App() {
  return (
    <DittoProvider setup={createDittoInstance}>
      {({ loading, error }) => {
        if (loading) return <span>Loading Ditto...</span>
        if (error)
          return (
            <span>
              There was an error loading Ditto. Error: {error.toString()}
            </span>
          )
        return <TasksPage />
      }}
    </DittoProvider>
  )
}

export default App
-
Now run
npm run devto start the app. You should see the following: -
You've probably noticed a
./dittodirectory in the root of your project. This is where the Ditto database is stored. You can delete this directory to reset the app to its initial state. You should add the following to your.gitignorefile to prevent this directory from being committed to your repository:
/ditto
If you've customized this path in src/App.tsx's createDittoInstance, then you should modify the .gitignore file to match.
Congratulations! You've just built your first Ditto and Electron app. You can now use Ditto to build apps that sync data across devices the traditional way (through the internet), but you can also build incredible offline-first apps that work even without an internet connection. There are so many ways to customize your electron apps with different frameworks, bundlers, and configuration. We hope this guide has given you a good starting point for building your own Ditto and Electron apps but stay tuned as we will release an npx comprehensive starter template shortly!